Why Quick Pickling is a Game-Changer for Home Cooks
Imagine biting into a crisp, tangy cucumber pickle that you made in your own kitchen, with no fancy equipment or days of waiting. Quick pickling, also known as refrigerator pickling, is the ultimate shortcut to preserving fresh vegetables with bold flavors. Unlike traditional pickling methods that involve sun-drying or lengthy fermentation, quick pickling delivers results in hours, making it perfect for busy home cooks who want vibrant, homemade condiments without the hassle.
What is Quick Pickling, Exactly?
Quick pickling involves soaking fresh vegetables in a vinegar-based brine, often with spices, herbs, or garlic, and storing them in the fridge. No sun-drying, no canning, no special tools—just a jar, some veggies, and a few pantry staples. The process is fast, beginner-friendly, and endlessly customizable, letting you transform everything from cucumbers to cauliflower into zesty snacks or meal enhancers in under a day.
My First Pickling Adventure (and Why You’ll Love It Too)
The first time I tried quick pickling, I was skeptical. Could I really turn a boring carrot into something I’d crave? I sliced up some carrots, tossed them in a jar with a simple vinegar brine, and added a pinch of dill from my garden. By the next morning, I was snacking on crunchy, tangy sticks that rivaled anything from the store. It felt like kitchen magic—and it’s a magic trick anyone can master.
The Best Vegetables for Quick Pickling
You can quick pickle almost any vegetable, but some shine brighter than others. The key is choosing fresh, firm produce that holds up to the brine’s acidity while absorbing its flavors. Here’s a rundown of top picks and why they work so well.
Cucumbers: The Classic Choice
Cucumbers are the poster child for pickling, delivering that iconic crunch and tangy bite. Opt for smaller varieties like Kirby or Persian cucumbers for the best texture. Slice them into spears or rounds, and they’re ready to soak up your brine in as little as 30 minutes.
Red Onions: A Vibrant, Versatile Topping
Pickled red onions add a pop of color and zesty flavor to tacos, salads, or burgers. Their natural sweetness balances the vinegar’s tang, and they’re ready to eat in just an hour. Thinly slice them for maximum brine absorption and a softer texture.
Carrots: Crunchy and Colorful
Carrots make delightfully crisp pickles, perfect for snacking or adding to sandwiches like banh mi. Cut them into thin sticks or coins, and let them sit for 12–24 hours for peak flavor. Their natural sweetness pairs beautifully with spicy or herby brines.
Jalapeños: For a Spicy Kick
If you love heat, pickled jalapeños are a must. Slice them into rings and pickle with garlic and black peppercorns for a fiery topping that’s great on nachos or pizza. They’re ready in about an hour but taste even better after a day.
Cauliflower: A Surprising Star
Cauliflower florets hold their crunch while soaking up brine flavors, making them ideal for snack boards or BBQ sides. Try a curry-inspired brine with turmeric and mustard seeds for a vibrant, flavorful twist. They’re best after 12–24 hours.
Table: Best Vegetables for Quick Pickling
| Vegetable | Ready In | Best Uses |
|---|---|---|
| Cucumbers | 30 min–2 hours | Sandwiches, burgers, snacks |
| Red Onions | 30 min–1 hour | Tacos, salads, burgers |
| Carrots | 12–24 hours | Banh mi, snacking, salads |
| Jalapeños | 1–24 hours | Nachos, pizzas, sandwiches |
| Cauliflower | 12–24 hours | Snack boards, BBQ sides, antipasti |
Essential Ingredients for Quick Pickling
The beauty of quick pickling lies in its simplicity. With just a few ingredients, you can create a brine that transforms your veggies into flavor-packed pickles. Here’s what you’ll need and why each component matters.
The Basic Brine Formula
A standard quick pickling brine consists of vinegar, water, salt, and sometimes sugar. The classic ratio is 1:1 vinegar to water, with 1–2 tablespoons each of salt and sugar per cup of liquid. This creates a balanced, tangy base that works for any vegetable.
Vinegar: The Tangy Backbone
White vinegar is a go-to for its clean, sharp flavor, but apple cider vinegar adds a slightly fruity note. Rice vinegar works well for milder pickles, like cucumbers or radishes. Avoid balsamic or red wine vinegar, as they can overpower delicate veggies.
Salt: Flavor and Preservation
Use kosher or pickling salt to avoid additives that can cloud the brine. Table salt is a no-go—it often contains iodine or anti-caking agents that affect flavor and clarity. Aim for 1–2 teaspoons per cup of brine for the perfect balance.
Sugar: Optional but Balancing
Sugar isn’t mandatory, but it softens the vinegar’s sharpness and enhances the vegetable’s natural sweetness. For no-sugar options, skip it entirely or use a pinch of honey for a natural alternative. Adjust to taste, especially for sweeter pickles like beets.
Spices and Herbs: Where the Magic Happens
Spices like black peppercorns, mustard seeds, or red pepper flakes add depth, while fresh herbs like dill or thyme bring brightness. Garlic cloves are a fan favorite for their savory punch. Experiment with combinations to suit your palate.
Table: Common Brine Ingredients and Their Roles
| Ingredient | Role | Best Pairings |
|---|---|---|
| White Vinegar | Sharp, clean acidity | Cucumbers, onions, carrots |
| Apple Cider Vinegar | Fruity, milder acidity | Beets, cauliflower, jalapeños |
| Kosher Salt | Enhances flavor, preserves | All vegetables |
| Sugar | Balances acidity | Beets, onions, carrots |
| Black Peppercorns | Adds subtle heat | Cucumbers, jalapeños, garlic |
| Fresh Dill | Bright, herbaceous flavor | Cucumbers, green beans |
Step-by-Step Quick Pickling Method
Ready to dive in? This foolproof method works for any vegetable and takes just 10–15 minutes of prep. Follow these steps, and you’ll have crunchy, tangy pickles chilling in your fridge in no time.
Step 1: Prep Your Vegetables
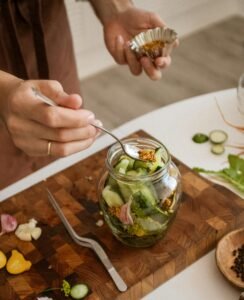
Wash and slice your vegetables into your desired shape—spears, rounds, or chunks. For cucumbers, trim the blossom ends to prevent softening. Pack them tightly into clean, airtight glass jars, leaving about ½ inch of headspace at the top.
Step 2: Make the Brine
In a saucepan, combine 1 cup vinegar, 1 cup water, 1 tablespoon kosher salt, and 1 tablespoon sugar (if using). Add spices like 1 teaspoon black peppercorns or a few garlic cloves. Bring to a simmer over medium heat, stirring until the salt and sugar dissolve, about 3–5 minutes.
Step 3: Pour and Cool
Pour the hot brine over the vegetables, ensuring they’re fully submerged. Use a clean utensil to press them down if needed. Let the jars cool to room temperature (about 1 hour), then seal with lids and refrigerate.
Step 4: Wait and Enjoy
Most quick pickles are ready in 30 minutes to 24 hours, depending on the vegetable. Cucumbers and onions can be eaten in as little as 30 minutes, while carrots or beets shine after 12–24 hours. They’ll stay fresh in the fridge for 2–4 weeks.
Quick Pickle Recipes to Try
Here are three unique, no-sun-drying quick pickle recipes to get you started. Each is designed to be simple, flavorful, and perfect for beginners. Let’s dive into the delicious details.
Recipe 1: Spicy Garlic Pickled Cucumbers
These fiery cucumber pickles are perfect for sandwiches or snacking. The garlic and red pepper flakes add a bold kick that builds with time.
- Ingredients (for 1 pint jar):
- 2 medium cucumbers, sliced into spears
- ¾ cup white vinegar
- ¾ cup water
- 1 ½ tsp kosher salt
- 1 ½ tsp sugar
- 2 garlic cloves, smashed
- ½ tsp red pepper flakes
- ½ tsp black peppercorns
- Instructions:
- Pack cucumber spears tightly into a clean pint jar.
- In a saucepan, combine vinegar, water, salt, sugar, garlic, red pepper flakes, and peppercorns. Simmer until dissolved.
- Pour hot brine over cucumbers, ensuring they’re submerged. Cool, seal, and refrigerate.
- Ready in 1–2 hours, best after 24 hours. Keeps for 2–4 weeks.
Recipe 2: Tangy Apple Cider Vinegar Red Onions
These vibrant pickled onions are a game-changer for tacos or salads. The apple cider vinegar gives them a slightly sweet, mellow tang.
- Ingredients (for 1 pint jar):
- 1 medium red onion, thinly sliced
- ½ cup apple cider vinegar
- ½ cup water
- 1 ½ tsp kosher salt
- 1 ½ tsp sugar
- ½ tsp black peppercorns
- Instructions:
- Pack onion slices into a clean pint jar.
- Combine vinegar, water, salt, sugar, and peppercorns in a saucepan. Simmer until dissolved.
- Pour brine over onions, cool to room temperature, then seal and refrigerate.
- Ready in 30 minutes, best after 2–4 hours. Keeps for 2–4 weeks.
Recipe 3: No-Sugar Curried Cauliflower Pickles
This sugar-free recipe brings a bold, savory twist with curry spices. It’s perfect for adding flair to snack boards or curries.
- Ingredients (for 1 pint jar):
- 2 cups cauliflower florets
- 1 cup white vinegar
- 1 cup water
- 1 tbsp kosher salt
- 1 tsp curry powder
- ½ tsp mustard seeds
- ½ tsp turmeric
- Instructions:
- Pack cauliflower florets into a clean pint jar.
- In a saucepan, combine vinegar, water, salt, curry powder, mustard seeds, and turmeric. Simmer until dissolved.
- Pour brine over cauliflower, cool, seal, and refrigerate.
- Ready in 12–24 hours, best after 2 days. Keeps for 2–4 weeks.
Pros and Cons of Quick Pickling
Pros
- Fast and Easy: Ready in hours, no canning or special equipment needed.
- Customizable: Endless flavor combinations with spices, herbs, and vinegars.
- No Waste: Perfect for preserving excess produce from gardens or markets.
- Healthy: Low-calorie, probiotic-rich (if fermented), and no preservatives.
Cons
- Refrigeration Required: Not shelf-stable like canned pickles.
- Limited Shelf Life: Lasts 2–4 weeks in the fridge, not months.
- Vinegar Intensity: Can be too tangy for some palates if not balanced properly.
Best Tools for Quick Pickling
To make quick pickling even easier, invest in a few affordable tools. These essentials streamline the process and ensure great results.
- Mason Jars: Wide-mouth 16 oz jars are ideal for small batches. Try SEWANTA Wide Mouth Mason Jars for durability and easy filling.
- Saucepan: A small, non-reactive saucepan (stainless steel or enamel) for heating the brine.
- Measuring Cups/Spoons: Precise measurements ensure a balanced brine.
- Clean Utensils: Use clean spoons or tongs to avoid contamination and extend shelf life.
Where to Get Quality Jars
For reliable mason jars, check out Amazon or local kitchen supply stores. A 10-pack of 16 oz wide-mouth jars typically costs $20–$30. Look for BPA-free lids and dishwasher-safe options for convenience.
People Also Ask (PAA) Section
How long do quick pickles last in the fridge?
Quick pickles last 2–4 weeks in the fridge when stored in an airtight jar. Always use clean utensils to prevent contamination, and check for off smells or sliminess before eating.
Can I reuse quick pickle brine?
You can reuse brine once for another batch within a few days, but its flavor and acidity weaken. For best results, make a fresh brine each time to ensure safety and taste.
Do quick pickles need to be refrigerated?
Yes, quick pickles must be refrigerated because they’re not canned or shelf-stable. Store them in the fridge immediately after cooling to keep them fresh and safe.
Can I quick pickle without sugar?
Absolutely! Sugar is optional and can be skipped for savory or tangy pickles. Try no-sugar recipes like the curried cauliflower pickles above for bold, sugar-free flavor.
FAQ Section
What’s the difference between quick pickling and fermentation?
Quick pickling uses a vinegar-based brine for fast results and refrigeration, while fermentation relies on natural bacteria and salt, taking days or weeks. Quick pickles are ready in hours; fermented pickles are probiotic-rich but require more time.
Can I mix different vegetables in one jar?
Yes, you can mix veggies with similar textures and pickling times, like cucumbers and onions. Be cautious with beets, as they may stain lighter vegetables. Ensure all veggies are submerged in brine.
Why is my brine cloudy?
A slightly cloudy brine is normal and often caused by spices or natural vegetable sediment. If it smells off, looks slimy, or shows mold, discard the pickles immediately.
How do I keep quick pickles crunchy?
Use fresh, firm vegetables, trim blossom ends (especially for cucumbers), and avoid overcooking the brine. Adding a bay leaf or grape leaf can also help maintain crispness.
What’s the best vinegar for quick pickling?
White vinegar offers a clean, sharp flavor, while apple cider vinegar adds a fruity note. Rice vinegar is great for milder pickles. Choose based on the vegetable and desired flavor profile.
Comparison: Quick Pickling vs. Traditional Pickling
| Feature | Quick Pickling | Traditional Pickling |
|---|---|---|
| Time to Ready | 30 min–24 hours | Days to months |
| Equipment Needed | Jars, saucepan | Canning equipment, jars |
| Shelf Life | 2–4 weeks (refrigerated) | Months to years (shelf-stable) |
| Process | Vinegar brine, no fermentation | Fermentation or canning |
| Best For | Quick, small batches | Long-term preservation |
Tips for Perfect Quick Pickles Every Time
- Use Fresh Produce: The fresher the vegetable, the crunchier the pickle. Shop at farmers’ markets or use garden-fresh veggies for the best results.
- Sterilize Jars: Rinse jars with boiling water or run them through a dishwasher to prevent bacteria growth.
- Submerge Veggies: Ensure all vegetables are fully covered by brine to avoid spoilage. Use a weight or small glass lid if needed.
- Experiment with Flavors: Try unique spices like star anise or fennel seeds for a twist. A little creativity goes a long way
- Label Jars: Write the date on your jars to track freshness. Quick pickles are best enjoyed within a month.
Why Quick Pickling is Worth Your Time
Quick pickling isn’t just about preserving vegetables—it’s about elevating your meals with bold, homemade flavors. Whether you’re topping a taco with zesty red onions or snacking on spicy cucumbers, these pickles add a personal touch that store-bought versions can’t match. Plus, it’s a fun, low-stakes way to experiment in the kitchen. My first batch of pickled carrots sparked a love for playing with spices and herbs, and now I can’t imagine a fridge without a jar of homemade pickles.
A Final Word of Encouragement
Don’t let the idea of pickling intimidate you. With just a few ingredients and 10 minutes of prep, you can create something delicious and impressive. Start with one of the recipes above, tweak it to your taste, and soon you’ll be pickling everything in sight. Your taste buds—and your dinner guests—will thank you.
For more pickling inspiration, check out Simply Recipes for additional flavor combinations or Amazon for high-quality mason jars to get started. Happy pickling!