Is there anything more satisfying than slow-cooked, fall-off-the-bone ribs? Whether you’re a pitmaster in training or a beginner home cook, low and slow oven-baked ribs are the perfect way to get juicy, tender, and flavorful ribs without the hassle of a grill or smoker. The best part? This recipe is super simple, making it accessible for everyone.
By the end of this guide, you’ll have all the knowledge and tools to whip up the most mouthwatering ribs in your oven. From choosing the right cut of ribs to troubleshooting cooking mishaps, we’ve got you covered.
Understanding the Basics of Ribs
Before we jump into the recipe, it’s important to know the basics. Not all ribs are created equal, and understanding the difference can make or break your experience.
Types of Ribs to Consider
- Baby Back Ribs
These are smaller, leaner, and more tender than other types of ribs. They cook quickly and are ideal if you’re looking for succulent and meaty results.
- Spare Ribs
Spare ribs are larger and have more fat, which makes them incredibly flavorful when cooked low and slow. They’re perfect if you want a more indulgent experience.
- St. Louis-Style Ribs
These are trimmed spare ribs with the breastbone and cartilage removed. They offer a consistent shape, making them easier to cook evenly.
The Importance of Quality Meat
Always choose high-quality, fresh ribs for the best results. Look for ribs with a good balance of fat and meat, ensuring they are not overly fatty or too lean. Ideally, source them from local butchers who can offer premium cuts.
Preparing for the Oven
Gather Your Ingredients and Tools
To get started, here’s what you’ll need:
- 1 rack of ribs (baby back, spare, or St. Louis-style)
- Aluminum foil
- Baking sheet
- Cooling rack (optional for better airflow)
- Ingredients for the dry rub (we’ll get to that soon)
Trimming and Prepping the Ribs
- Remove the Membrane
Flip the rack bone-side up and use a knife to loosen the silver membrane. Grip it with a paper towel and pull it off. Removing this ensures tender ribs.
- Pat Dry
Use paper towels to pat the ribs dry. This ensures that the dry rub adheres properly.
Creating the Perfect Dry Rub
Components of a Great Dry Rub
A great dry rub is a blend of sweet, salty, spicy, and savory. Here’s the basic framework:
- Sweetness: Brown sugar caramelizes beautifully on the ribs.
- Saltiness: Use kosher salt for depth of flavor.
- Spice: Paprika and cayenne add a kick.
- Savory Notes: Garlic powder, onion powder, and black pepper make every bite irresistible.
Tried-and-True Dry Rub Recipe
- 2 tbsp brown sugar
- 1 tbsp kosher salt
- 1 tbsp paprika
- 1 tsp garlic powder
- 1 tsp onion powder
- 1/2 tsp black pepper
- 1/4 tsp cayenne pepper
Mix the ingredients thoroughly and generously coat the ribs. Massage the rub into both sides for maximum flavor.
The Low and Slow Baking Process
Temperature and Cooking Time
- Preheat your oven to 275°F (135°C).
- Place the prepared ribs on a foil-lined baking sheet. For better airflow, position them on a cooling rack set on the sheet.
- Cover the ribs tightly with aluminum foil to trap moisture.
Cook them for 2.5 to 3 hours. For spare ribs, you may need to go up to 4 hours to ensure they’re tender.
Keep the Ribs Moist
If you’re worried about drying out the ribs, you can add a small pan of water to the oven to increase humidity. Alternatively, spritz the ribs with apple juice or a mix of vinegar and water every hour.
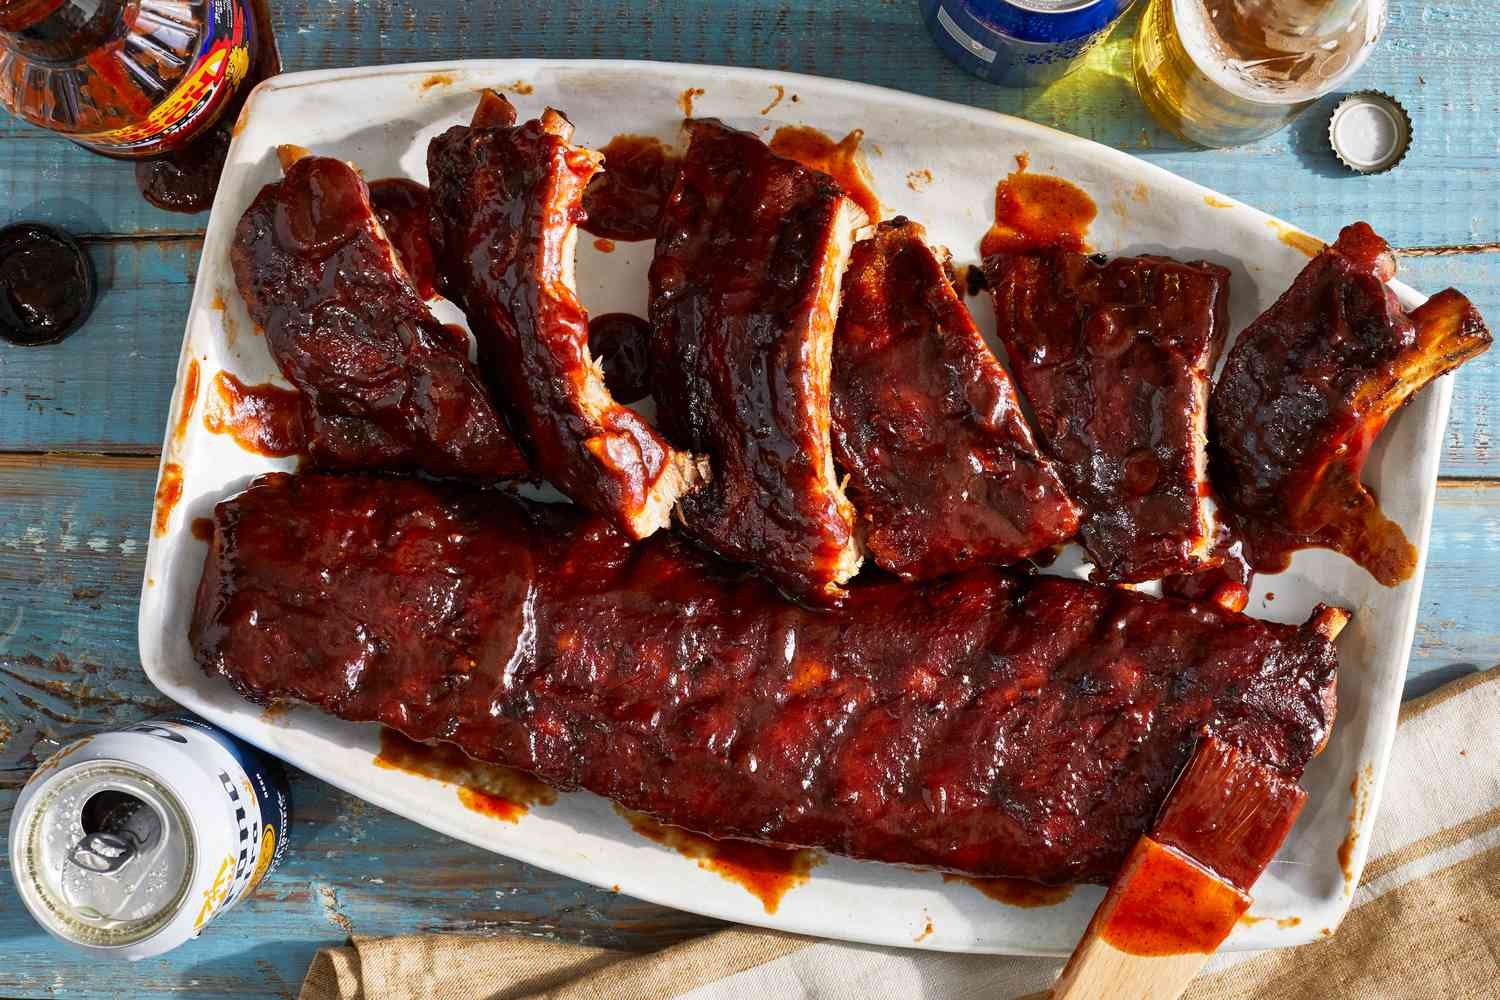
Adding Flavor with BBQ Sauce
When and How to Apply BBQ Sauce
BBQ sauce is optional, but it adds a sticky, caramelized layer to your ribs.
- About 30 minutes before the ribs finish cooking, remove the foil and brush on your sauce.
- Pop them back into the oven, uncovered, to allow the sauce to glaze.
DIY BBQ Sauce Recipe
Here’s a simple BBQ sauce you can whip up:
- 1 cup ketchup
- 1/4 cup apple cider vinegar
- 2 tbsp brown sugar
- 1 tbsp Worcestershire sauce
- 1 tsp smoked paprika
- Dash of hot sauce (optional)
Simmer all ingredients together for 10 minutes and set aside to cool.
Checking for Doneness
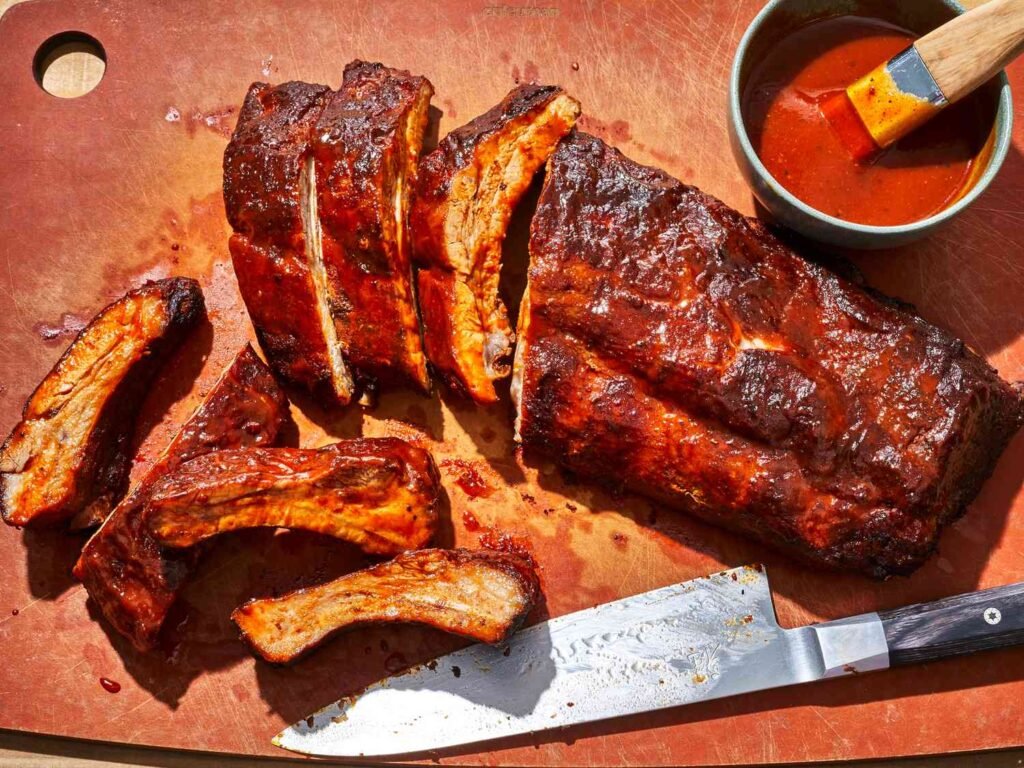
How to Know When Your Ribs Are Perfectly Cooked
- The Bend Test
Pick up the rack with tongs. If the ribs bend in the middle and the meat starts to crack, they’re ready.
- Bone Pull Test
The meat should pull back slightly from the bones.
- Internal Temperature
For precision, use a meat thermometer. The internal temperature should be 190°F to 205°F for tender, juicy ribs.
Resting and Serving the Ribs
The Importance of Resting
Rest the ribs for 10 minutes after pulling them out of the oven. This allows the juices to redistribute, ensuring every bite is as juicy as possible.
Serving Suggestions
Pair your ribs with classic sides like coleslaw, baked beans, cornbread, or roasted vegetables. For drinks, go for a crisp beer or iced tea to complement the smoky flavors.
Troubleshooting Common Issues
Why Are My Ribs Tough?
- They weren’t cooked long enough. Low and slow is key for tenderizing the meat.
Why Are My Ribs Dry?
- You may have cooked them uncovered for too long or at a temperature that was too high.
Uneven Cooking
- Make sure the rack fits snugly in your oven and avoid overcrowding. Consistent heat distribution is essential.
People Also Ask (PAA)
How long does it take to cook ribs in the oven at 275°F?
Cooking ribs at 275°F typically takes 2.5 to 3 hours for baby back ribs and up to 4 hours for spare ribs.
Do I need to flip ribs while baking?
No, flipping isn’t necessary if you bake the ribs in foil.
Can I prepare the ribs the night before?
Yes, you can apply the dry rub and refrigerate the ribs overnight for maximum flavor.
Recap the Perfect Ribs Recipe
With simple ingredients, minimal equipment, and a little patience, you can create low and slow oven-baked ribs that rival BBQ joints. Whether you’re a seasoned cook or a beginner, this recipe delivers maximum flavor with minimal effort.
Still have questions? Share your thoughts or leave a comment below. Happy cooking and happy eating!